


Welcome to the ultimate guide to growing and harvesting oregano! Are you ready to transform your garden and take your growing skills to the next level? First of all, congratulations if you’ve purchased your new oregano plant from us. You’ll be able to learn how to harvest and care for your plant, whether you want it for your kitchen or to make herbal extracts. Here, you’ll discover all the vital aspects necessary to keep your oregano plants healthy and productive, making the most of every leaf. What we need to understand is the following:
Conditions & Growing Space
Watering Frenquency
Nutrition
Plant Managent
Puring and Harvesting
Pests and Diseases
Production Methods
Tips for Care

As with any production aspect, we need to plan the space where our plants will be produced. An important factor is understanding the ideal climatic conditions. analyzing this can guarantee a healthy and abundant harvest. Oregano evolves in warm conditions; it’s a very resistant plant that retains moisture despite being in hot areas. Its vegetative stage occurs between 68°F/95°F (20°C/35°C), which is ideal for rapid development, depending on the space it has to grow and the nutrients it´s given. Oregano can be grown both indoors and outdoors, given that either space has:
Low humidity in the environment
Warm temperature within the mentioned range (avoid low temperatures)
Prolonged exposure to sunlight or artificial light for at least 6 hours
Good ventilation (for indoor care)
If you choose to grow outdoors, we recommend placing plants in a shaded area and avoiding direct sunlight, which can affect the leaves, especially in summer. Ensure good ventilation if you have plants in a greenhouse outdoors.
(GROWING MEDIUM PREPARATION)

SUBSTRATE
The growing medium is essential since it’s the plant’s nutrient administration and root propagation route for oregano, the best development occurs in sandy or clay soils that are somewhat alkaline. These conditions can occur naturally; however, one of the qualities that requires attention is that the soil has sufficient water drainage. Water accumulation significantly affects the health of its roots, generating diseases and slow development.”

Oregano is a low-maintenance plant that requires moderate watering. The ideal frequency is every 1 to 2 weeks, but it can vary depending on the season, temperature, and soil type. Sandy or well-draining soils are best. Avoid overwatering, as it can lead to root rot and fungal diseases. Symptoms of overwatering include yellowing leaves, wilting, and leaf drop. When growing oregano in pots, ensure the pot has good drainage and check the soil moisture before watering. Allow the top inch of soil to dry out slightly between waterings. During warmer months, you may need to slightly increase the frequency of watering.

Organic Option
The best selection with oregano is a composted substrate rich in nitrogen and phosphorus such as bat guano or bone meal. These are ideal organic options for proper nutrition. Additionally, use microbial inoculants these will produce beneficial microorganisms for nutrient assimilation in the plant, ensuring that the plant can develop 100% organically.
Mineral Options
The use of controlled-release granulated fertilizers is ideal for maintaining essential nutrients with each irrigation. They are designed with a low-solubility membrane that allows for gradual dissolution as water penetrates the coating, releasing nutrients slowly. This can extend the effectiveness of the fertilizer between 2 to 6 months, depending on soil and environmental conditions. Moreover, it is not necessary to maintain high humidity levels in the soil for the fertilizer to be effective.
Liquid Fertilization
Liquid fertilizers are useful options when growing in soils with low nutrition. Nutrient uptake is possible by controlling pH, electrical conductivity (EC), and nutrient PPM (Parts Per Million) present in the irrigation water. The importance of these factors will indicate if we can successfully and continuously nourish the plant. For this, you need to use tools like pH meters and EC meters.
You can use balanced NPK (Nitrogen, Phosphorus, Potassium) fertilizers. This formula helps the plant create healthy and vigorous growth. Nitrogen is crucial for green leaf development, phosphorus is beneficial for root and flower development, and potassium will assist with overall plant health. The use of Calcium and Magnesium (Cal-Mag) supplements can be beneficial, especially if you are using soft water or notice specific deficiencies in the plant.
General Recommendations
As mentioned in the organic options, the use of microbial inoculants is beneficial. If your soil is nutrient poor, initially use the inoculants to ensure survival of the growing medium. You can also combine this with mineral nutrition, ensuring successful nutrient uptake.
Mineral Dosage:
Follow the manufacturer’s instructions for the correct dosage, but generally, diluting the fertilizer to half the recommended concentration is a good starting point to avoid over-fertilization.
Monitoring:
The pH of the soil and nutrient solution should be maintained between 6.5 and 7.0 to ensure optimal absorption.
Plant Analysis:
Regularly observe the plant to detect any signs of nutrient deficiency or excess and adjust nutrition accordingly. We recommend keeping a record of the solutions used and the pH & EC levels in the irrigation water to help you refine dosage.
Irrigation Use:
You can maintain a nutritional irrigation schedule every 2 to 4 weeks, depending on climatic conditions and general plant observation. If the soil remains humid after prolonged use of nutrition, discontinue use of mineral nutrition and water as usual. If using mineral nutrition, ensure continuous drainage and avoid waterlogging, as over-fertilization can harm the plant.
Want to learn more about using mineral nutrition for your plants? Subscribe to our newsletter for expert tips and tricks to grow a thriving oregano garden! 🌴

Oregano can be grown in pots, grow boxes, or directly in the ground. For optimal growth, a spacing of 12 to 16 inches between plants and 20 to 24 inches between rows is recommended. This spacing allows for adequate plant growth and facilitates cultivation tasks.
Pot Types: You can use plastic, fabric pots, or grow boxes. The pot depth should be at least 12 inches. Ensure that the pots have adequate drainage.

Transplanting: Oregano seedlings are transplanted when they are a manageable size and have developed a strong root system. It is important to handle the roots carefully to avoid damaging them.

Pruning is essential for maintaining a healthy and productive oregano plant. By pruning, we stimulate the growth of new branches and prevent the plant from becoming woody and producing small, weak leaves.
Pruning Techniques:
When to prune: The best time to prune is in late spring or early summer, after the risk of frost has passed.
How to prune:
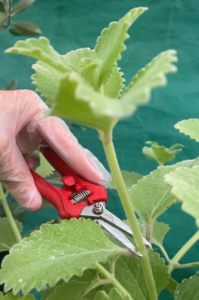
Use clean, sharp pruning shears to prevent the spread of disease.
Cut branches just above a leaf node, where new growth will emerge.
Do not remove more than one-third of the plant in a single pruning.

Harvesting:
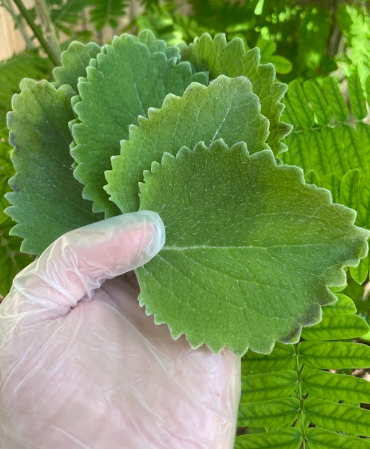
When to harvest: Harvest oregano leaves just before the plant flowers, as this is when their flavor is most intense.
How to harvest:
Cut the stems about 2-4 inches above the ground.
If you want to dry the oregano, hang the stems in a warm, dry, and dark place.
Benefits of Pruning:
Increased leaf production: Pruning stimulates the growth of new branches and leaves.
Improved flavor: Leaves on new growth tend to have a more intense flavor.
Healthier plants: Pruning helps to prevent diseases and pests.
Longer plant life: Regularly pruned plants tend to live longer.
Recommendations:
Fertilization: After heavy pruning, it is advisable to fertilize the plant to provide the nutrients necessary for new growth.
Pests and diseases: Regularly inspect the plant for signs of pests or diseases and treat them promptly.

Oregano, despite being a resilient plant, can be affected by various pests and diseases. The key to successful cultivation lies in prevention and proper management.
Common Pests:
Mealybugs: Small insects that cover themselves with a waxy substance and feed on plant sap, weakening it.
Spider mites: Microscopic mites that weave fine webs and suck the sap from leaves, causing yellow spots and deformities.
Whiteflies: Small flying insects that feed on leaf sap and transmit viral diseases.
Aphids: Small insects that cluster in colonies and suck sap, deforming leaves and producing honeydew.
Want to learn how to protect your garden naturally? Discover biological control and meet your most powerful allies!
Common Diseases:

Powdery mildew: A fungus that produces white powdery spots on leaves and stems, favored by humidity and poor ventilation.
Leaf spots: Caused by various fungi or bacteria, they manifest as spots of different colors on leaves, which can cause defoliation.
Root rot: Disease caused by fungi that develop in conditions of excess moisture and poor soil aeration.
Prevention and Control:
Cleanliness: Keep the cultivation area clean and free of plant debris.
Ventilation: Ensure good air circulation around the plants.
Proper watering: Avoid overwatering and waterlogging.
Regular inspection: Check plants regularly for any signs of pests or diseases.
Biological control: Introduce beneficial insects such as ladybugs and lacewings to control pests.
Organic treatments: Use organic insecticides and fungicides in case of mild infestations.
Conclusion:
Prevention is the best strategy for controlling pests and diseases in oregano cultivation. By carefully observing our plants and taking preventive measures, we can enjoy a healthy and productive crop.

To successfully reproduce oregano in your garden, you can choose to use seeds or propagate new shoots using cuttings or dividing your plant.
Seeds:

Select an ideal space for seed germination. Opt for hydrating the seeds for 24 to 42 hours before introducing them to the growing medium. We recommend waiting for the first root sprouts to appear before planting. Remember, root development is crucial for the plant’s life.
Cuttings:

Producing cuttings involves using a healthy plant with good branch extension. You will need to measure approximately 3.94 in (10 cm) to obtain a formed plant. Cut the selected stems and keep them submerged in water for about 12 to 15 days, changing the water every week. For your cuttings to become plants, favorable climatic conditions are essential. Ideally, maintain a temperature of 68°F to 95°F (20°C to 35°C) with good lighting. When you see the first roots, you can celebrate! You have successfully converted stems into young plants. However, allow the roots to develop a bit before transplanting your new plants to the substrate or growing medium of your choice.
Production by Division:

This is another technique you can use with your adult plants. It involves slightly increasing the moisture in the substrate and maintaining good hydration for an extended period (about 1 week).
Remove 0.79 in (2 cm) of substrate layer.
Observe if the main roots are well-formed.
Select the stem with the most roots in your plant.
Disinfect your scissors and cut the selected stem.
Transplant the stem to a pot with good substrate.
Recommendations
This method is practical for multiplying your production with adult plants. However, it should be done in the spring when climatic conditions are optimal for good recovery and development. There are risks that your new plant may not thrive or that your primary plant may be affected. Try, analyze, and select the best method to propagate your crop.
Grower. If you have doubts, leave a message in the grower mailbox, and we will read it. 🌱
General cleaning: Keep the growing space and tools clean.
Good ventilation: Temperature control is crucial for healthy development.
Plant rotation: If your plants are growing in pots, rotate their locations to significantly change the conditions and eliminate negative factors in the space.
Circular cultivation: In your garden, maintain areas with plants that help prevent pests, such as rosemary, mint, spearmint, and basil.
Good drainage: Drainage is the key to healthy roots.
Preventive measures: Use biological insecticides and fungicides whenever possible. These products are safer for the environment and pollinators. Carefully read the instructions and apply the products according to the manufacturer’s directions.
Pruning: Maintenance and pruning improve plant development, enhance oxygenation, and eliminate potentially sick leaves.
Note: It may be helpful to guide yourself in controlling your garden. These techniques will ensure a successful harvest, whether you’re growing oregano or tomatoes (consult our cultivation table for growers).
Its like you read my mind! You appear to know a lot about this, like you wrote the book in it or
something. I think that you can do with some pics to drive the message home a
bit, but instead of that, this is excellent blog.
A great read. I’ll definitely be back.
Reading your piece felt like walking through a lush garden of ideas, each one blooming with vibrant insights that invited both contemplation and joy. Your words move with such effortless grace, and the way you bring together seemingly disparate thoughts into a cohesive whole is nothing short of magical. It’s a rare gift to make complex ideas feel so accessible, yet so profound.
Incredibly detailed and helpful guide on oregano! I especially appreciate the depth on aspects like watering and nutrition, as well as the different propagation techniques. A question has arisen regarding the fertilization part: you mention using microbial inoculants for nutrient-poor soils and the option of combining them with mineral nutrition. Is there any risk of over-fertilization or inhibiting the microbes’ action if both are used simultaneously? Also, regarding plant rotation in pots, could you provide specific examples of how to effectively change the conditions? Finally, for harvesting and pruning, are there any key visual cues that indicate the optimal time for the first major prune after the plant has matured a bit?
Hey Elena! 👋🏽
So glad you’re diving into gardening! Here at Genetics Growers, our mission is to make your plant experience super simple, rewarding, and inspiring. We want you to feel as comfortable cultivating as we are creating these solutions.
To help your plants grow strong and healthy, here are a few key tips based on what you’re planning:
1. The Perfect Dose is Key! 💧
I think it’s awesome that you’re considering using microbial inoculants—that’s an excellent idea! Just remember, when combining them with your mineral nutrients, the secret is balance. If you put in too much fertilizer, it can actually be counterproductive for those tiny microbial helpers.
My Advice: Always follow the dosing instructions carefully. In gardening, it’s almost always better to err on the side of slightly less than to overdo it.
2. You’re the Boss of Your Potted Garden ☀️
One of the biggest advantages of having your plants in pots is that you have total control over their environment. If you notice it needs more sun, less humidity, or a different temperature, just move it! Rotate it to get even light or place it in the ideal spot for your specific species. You’re the conductor of your own green orchestra!
3. Signs for the First Pruning ✂️
The first pruning is an exciting milestone that will give your plant its final shape. I recommend waiting just a little longer, until it’s stronger and more mature.
What should you look for? There are four main signs that indicate it’s ready:
It has developed a robust, well-established root system.
It has reached a height of at least 15–20 cm (6–8 inches).
It has several true leaves and dense, bushy growth.
If you notice it’s stretching too much (we call it “leggy”), pruning will work wonders to help it grow more compact and bushy.
I hope these tips are super helpful on your journey! If you have any other questions, run into a small challenge, or just want to share your successes (which I’m sure you will!), don’t hesitate to reach out. We’re here to support you every step of the way!